The 302 broke in 2005 when I was just starting to put a severe case of the whoop ass on a 2002 WS6 Trans Am and the valve decided it no longer needed the head on the #7 cylinder. Needless to say there was antifreeze dripping out of the 3" exhaust. That was all the excuse I needed to park the car and I did just that for over three years. I moved from OK to TX and the job change allowed me to rethink what I wanted to do with the car and I decided a more street friendly suspension was in order, bigger brakes, more motor, and to revamp the nitrous system.
Well the exhaust is done (http://www.foxtbirdcougarforums.com/showthread.php?31210-Custom-Exhaust-for-the-351W), the Cobra brake conversion is complete (I have some pictures scattered on this site), the suspension has been updated (you can see the Griggs setup in the exhaust thread) and all that is left is to get the motor breathing. The last one has been kicking me in the ass with the small stuff. The motor has been built for over a year but I live over 8 hours away so I get up there every other month.
I finally located the Carb Shop again out in California and had them freshen up the carb they built for the car back in '98. I had it updated and switched over to a road race/street build and rejetted for the 351W.
I had the guys at NX rework the fuel and N02 solenoids and check the Gemini Twin plate to make sure all the spray bars were in working order and they hooked me up.
I ordered the diaphragm rebuild kits for the Mallory return style regulator for the carb and the two Holley regulators for the nitrous system. Got the Holley's rebuild at the house in about 30 minutes but the Mallory replacement diaphragm was totally different than what came out of the regulator. I few days and a couple of phone calls and I found out they changed designs a few years ago and no longer offer the kit for the one I had. Tossed the body in the recycle bin at work and ordered a new one after searching high and low on the internet for a good price.
I went home last weekend and got he carb installed with the plate under it only to find that the carb was sitting way to high to clear the hood. Remove the plate and the hood clears. Install the 14" diameter by 4" tall K&N air filter with a drop base and the hood hits again. This was solved by ordering a 3" tall K&N. I used the formulas on K&N's website and found out I was way over sized on the filter to begin with and the 3" tall unit was just about right so that made life a little better. Here are some picture with the carb on the motor and all the fuel lines installed:
Here are a couple with the hood on the car:
Forgive all the dust but I have not washed the car in over five years. It will go to the body shop after I get it running to install the new TC nose and replace the Certshiznit passenger fender with a factory one.
So the dilemma was what to do with the NX system as I have four freshly rebuilt solenoids and two completely full 15lb bottles in the trunk...can you say fogger? One of my buddies has run nitrous for years and does his own installation work and I usually wire them so I gave him a call to see what would be needed. He called NX and they have a conversion kit that will work with my solenoids. Looks like the Vic Jr intake is coming off and the bungs on the intake runners are getting drilled and tapped the week of the 4th of July.
Anyhow, I am hoping to have the car fired back up that week if all goes well. Did I mention the tags are over 7 years out? Ask Vinnie how wonderful the state of OK is on that now. Most likely will get tagged in TX to avoid all the penalties.
Anyhow, I will update this as I make progress but it will be slow with the distance.
I was a little work but I think the outcome was well worth the effort. I found several vendors of this type of head light but these were the ones I chose due to the quality.
Got the Mark VIII fan install finished with the DC Controller this weekend and just wanted to post up some pics in case anyone was contemplating this install.
I need a set (2) of the head light sockets for the outside head lights (high/low beam) for my '83 T-Bird. I am pretty sure these could come off of a Cougar, Mustang, Thunderbird, etc. as long as it is a four headlight car. I went to the parts store and the replacement ones are a joke and I don't want to cut my factory harness. I have a picture of the high beam side sockets which are only two wire but I need the ones that have three wires going into it. If you have an old harness and just want to cut the wires off to leave a pigtail that is fine as I can remove them. Either way is fine with me.
Front View:
Side View:
Back View:
I shot hcor a private message but wanted to cover my bases so I can get my head light project completed.
Well, its been a long road (literally and figuratively) putting my Bird back together after I scattered the 5.0 motor in 2005. I was so pissed off at the whole deal I stuffed it into storage for about three years and then my dad's shop got finished and we brought it to his house. I live about five hours away so I have to plan my trips there to work on it. Some may wonder why the hell I would do this but its where I grew up and have all my car connections (paint, motor, machine work, and exhaust) so it makes better sense to leave it there. The 351W has been built for awhile now and the TKO was in it with the 5.0. The exhaust on the car with the 5.0 was MAC long tube 1-3/4" primaries with 3" collectors, a hand built 3" off road X-pipe, and a MAC 3" cat back system for a Fox LX Mustang with the rear portion of the tail pipes extended 8" with 3" pipe (lots of grinding, welding, and filing to get them to look right).
With the 351W I figured it was time to up the anti and go big. I have a friend back home that builds race cars from the bottom up and he builds headers. We talked about what I wanted from the car and the possibility of a stroker kit later on down the road so we went with 1-7/8" primaries and a 3-1/2" collector. It took him several months to build them with all the work he has and he got pretty sick at one point but modern medicine fixed him up. The headers are done and I am headed back home this weekend to build the 3-1/2" off road X-Pipe and modify the old 3" X-pipe to accept cats so I can pass inspection here (visual only). Just thought I would share some pics of the headers in the car and I will update this thread as the exhaust comes along. This could take a couple of months as its time consuming and not cheap.
Here are a couple of pictures of the driver side:
I will put some of the passenger side in the next post.
I am not 100% sure but I believe the 83-86 seat brackets are the same and the 87-88 are different. If that is incorrect please post the correct info as that will help others.
I made some aluminum flat bar seat bracket adapeters for the new Corbeau TRS seats that are going in my 83 Bird. I originally had 85 Mustang GT seats in the car and there were no modifications except tapping the 8mm X 1.25 pitch threads in the hole that lined up on the bolt holes on the rear of the brackets. There is one hole on the front of the seats and four on the rear. The Mustang brackets use the first from the front of the four rear holes and the brackets out of my Bird used the third from the front out of the four rear holes. You can see what I am talking about in this picture:
Ford did not tap the threads on any of the rear holes except for the ones that were used by the brackets in the Mustang. I used an 8mm X 1.25 pitch tapered tap and very carefully and with some cutting fluid tapped the holes I needed to get them in my car.
Since I had sold the seats in my car to a guy in Kentucky I could not measure the seats to get the differneces in the bolting patterns between the two different seats. I figured since the Mustang seat bolted into the car then I could just measure those holes. It was a good thing I mocked up the Bird brackets on the GT seat I managed to pull from the side of a buddy's shop as I found out about the differnces in how they bolt up. I know, long story so lets get to the point.
I sketched up the differences between the the two seats' mounting points, scanned it, and then converted it to a .jpeg so it would post here but its kinda small since its hosted on photobucket. If you want a copy just IM me and I will email it to you.
So a person can see how the two bolting patterns line up on top of each other. This is how it translates to a 1-1/2" X 1/4" X 15" piece of 6160 aluminum flat bar which can be had at any metal supplier. I will note that Lowes, Home Depot, and Sutherlands no longer stock this size in my area so maybe that will save you some driving
Once I had the holes laid out on the aluminum flat bar I center punched them and then drilled them with a 1/8" bit for a pilot hole. I then used a 3/8" bit to finish drilling the hole out. The bolts are roughly 5/16 (8mm X 1.25 pitch) so this would allow some room for error. Here are some shots of the adapters mounted on the seat brackets:
The brackest on my car had a rivit (for lack of better words) which was not flush with the mounting area between the flat bar and the bracket. I took a ginder and removed just enough material so the flat bar would lie down flat. You can see this here (its the shiny round spot at the back of the bracket):
The adapters wanted to teader at this location so I used one of the lock washers and placed it between the flat bar and the seat bracket which worked really well. The location was opposite of the shiney round spot in the picture above. I did this for both seats.
Here are the brackets mounted up on the seat:
As you can see there is minimal gain in height and I can tell you that the Corbeau seats are not higher than the stock seats. I am 6'-1" so this was of some concern but I sit fine in the Coupe and I know that the Bird has much better cabin room.
As for bolting, each of the Corbeau seats come with (4) 8mm X 1.25 pitch X 25mm long allen head cap screws. I also bought ( 8mm X 1.25 pitch X 20mm long allen head cap screws, (10) 8mm lock washers, and ( 8mm X 1.25 nylon locking nuts. I used two of the longer cap screws that came with the seats and two of the locking nuts on the inner seat brackets to the adapters as they are a bit thicker than the outer brackets. I used two of the shorter cap screws with two of the locking nuts on the outer bracket to the adapters. The remaining two longer cap screws and two lock washers were used to mount the adapters to the front of the seat and the two remaining shorter cap screws and two lock washers were used to mount the adapters to the rear of the seat.
The car is still getting exhause work done but I will update this with pics when they are finally in the car. I just wrapped them up in plastic bags and put them up in the loft in the shop. Anyhow, hope this helps someone in the future.
I need to know what the measurement is between the bolt holes where the base of the seat bolts to the brackets. It may be different from the front to the rear but I am not 100% sure. I brought my manual brackets home with me from my dad's shop in Oklahoma so I could work on getting the Corbeau's mounted to them about three weeks ago and am finally having the time to get this done. I sold the 85 GT Halo seats out of the car so I am hosed there as I cannot have my dad measure it for me. I am headed up there in two weeks so I can take the brackets with me and bolt them in the car and measure it that way but I sure would like to take the seats up there and just bolt them in if someone here has the info I need to get it done before then.
I have read a few threads with concerns over what size replacement fuel pump to buy and thought there should be an easy way to calculate the required pump volume (l/hr) based on the injector mass flow rate (lb/hr) and the number of injectors (unitless).
I did a quick search online and found the average weight of a gallon of gasoline to be about 6.2 lb/gal. The basic conversion for one gallon to liters is 3.785 l/gal. With that knowledge you can make an equation using the following:
Injector Mass Flow Rate = X lb/hr (the number will vary with the rate of the chosen injector) Number of Injectors = Y unitless (the number will vary with the engine application) Weight of a Gallon of Gasoline = 6.2 lb/gal (this is pretty much fixed) Number of Liters to a Gallon of Gasoline = 3.785 l/gal (fixed number)
[(X lb/hr) x Y x (3.785 l/gal)] / (6.2 lb/gal) = volumetric flow rate of fuel pump needed at 100% injector duty.
Once you do the unit cancellation you end up with l/hr so I am pretty sure I got the equation right, if not please feel free to correct. I ran the numbers for a V-8 car and came up with the following:
(19lb/hr x 8 x 3.785 l/gal) / 6.2 lb/gal = 92.7935 l/hr (makes sense as a stock 5.0 car comes with a 90 l/hr pump)
I used these guys to clean and flow test my old 24 lb/hr injectors and it was well worth the cost to get them back withing a few percent of each other. It solved the lean/rich problem I was battling on the old motor.
Anyhow, maybe this will help someone and hopefully I did my math correct.
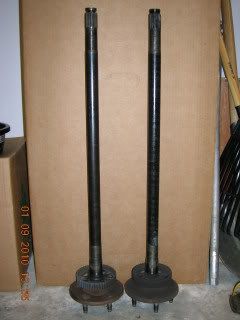
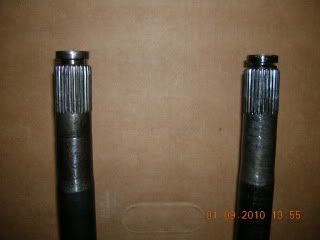
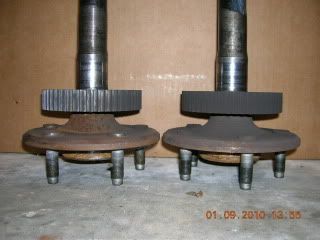
I have a stock set of rear axles (28 spline) that are out of a 95 GT with ABS reluctor (exciter) rings (5-lug) - $50 plus shipping to any of the lower 48 states via UPS. These axles measure 30" long and should fit most TC rear ends. I have more pictures if someone would like them just PM me your email address.
These are a pair of 85 Mustang GT seats with the Halo head rests that I am selling for $300. I had them recovered by a shop in OK several years ago. They have been in the 83 Bird and I am pulling them out selling them to go a different direction with the interior. I am keeping the manual seat tracks for whatever seats I go with. I would prefer not to ship but would consider it for another $100 as these will not be cheap to ship packaged the right way. I am only willing to ship to the lower 48 states. The pictures are of the driver seat as the passenger seat is still in the car. The seats are in a shop in Lawton, OK right now so anyone close to there or my house in Longview, TX would be ideal. I have them posted on two other Mustang sites but someone here may find them ideal for their project.
I am in the middle of setting up the pinion angle in the ’83 and have a question with regards to the direction that the pinion needs to point. I have read all kinds of differing opinions on the degree that the pinion angle should be set at and whether or not the pinion should point up or down. The car has adjustable LCA's (Griggs) and UCA's (Global West) so I can adjust how the rear end sits in the car from front to back and in rotation or pinion angle.
I took my handy Craftsman buttstuffog angle indicator with a straight edge and measured off the lower pulley on the crank. It read 7.0 degrees of downward angle (the front of the motor is higher than the rear of the transmission). I moved the angle finder to the drive shaft and it is measuring 4.0 degrees of downward angle (the front being higher than the rear). For me this gives a net angle of 3.0 degrees difference between the output shaft of the transmission and the drive shaft (DS). I measured the pinion angle on the back of the pinion using the straight edge and came up with 1.0 degrees. This also gives me 3.0 degrees of difference between the DS and the pinion. So what I have is the engine centerline going downhill from the front of the car to the output shaft of the transmission, the DS centerline going downhill from the transmission to the rear end, and the pinion going uphill from the pinion to the rear end cover.
My question is should the pinion centerline and the motor centerline be running in the same direction or should they be opposite like they are now? I went here:
and found on page 9 a diagram that shows the center lines running in the same direction and the angles needing to be the same. This is on a Mustang but I would think it would be the same for our cars. I also found this article on drivetrain.com which was a good read and also states that “Ideally, the operating angles on each end of the driveshaft should be equal to or within 1 degree of each other, have a 3 degree maximum operating angle and have at least 1/2 of a degree continuous operating angle.”
Seems to have a few good parts that someone may need. I bought the TC cover and Marchal fog lights and brackets from him. He did not have the brackets listed so he may have other items not listed as well.
My Coupe has some noise in the valve train and I just always assumed it was normal from talking with a couple of guys that build a few engines a year. I started reading Vinnie's new thread on his 88 getting a new motor and the issue came up again. Well, after searching and reading a few threads on noisy valve trains I am beginning to think that it is not common to have noise and something is up with the motor in my Coupe.
I have ran the valves on this car about a dozen times and it still has noise. From what I am reading here the noise the Coupe has is more than normal. The motor has Edelbrock Performer heads (2.02/1.60), Edelbrock Performer RPM II upper and lower intakes, Jomar Ultra-Lite stud girdles (http://www.jomarperformance.com/ultralite.php), the Motorsport tall aluminum valve covers, Manley severe duty valves, Manley titanium retainers and keepers, Isky 8005-A valve springs, Ford Racing M-6500-R302 lifters, Crane Cams 11746-16 Energizer roller rockers, and a 35-518-8 Comp Cams camshaft (http://www.compcams.com/Cam_Specs/Ca...csid=1057&sb=0).
With all of that said I followed the Comp Cams valve adjustment process that I got with the cam that is in the motor. I continue to get noise even after several attempts to adjust the preload. What I noticed in several of the threads was having to correct push rod length. I went on Comp Cams website and found these:
I did not check the pushrod length as another person built the motor and I just assumed they would have measured them. This is starting to look like the problem but I wanted to know how to measure for the correct push rod length once I get the correct adjustable checking pushrod. Any help would be appreciated.


 8mm X 1.25 pitch X 20mm long allen head cap screws, (10) 8mm lock washers, and (